top of page


 Pond LayoutBottom drain with surface skimmer and jets to circulate the water and direct waste to the drains. |  Filtration DesignThere is no one way to do this so research, research, research! | 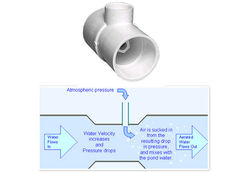 Pond AerationWe'll be forgoing an air pump and using the waterfall and a Venturi valve on one of the jet returns to generate oxygen for the Koi |
|---|---|---|
 Rain collection barrelWe have a food grade rain collection barrel setup to store water to replenish evaporation. We hope to use little city water for this pond. We also have a 50' hose to water our plants and trees when we back wash the filter that offsets the use of sprinklers. |  LayoutThis was tough because most of the yard is covered by a giant tree with needles that are not great for putting a pond under. We decided on a spot we could see from the bedroom and kitchen and that we could rebuild the deck around the pond. |  The Dig Begins!Had some help with this one. The ground was packed hard! |
 Bottom drain in! |  Ready for footing pour!Rebar is placed to create a really strong footing. (Bottom drain temporarily buried) |  Blocks deliveredYou may notice that some have cut outs on the side. This are called bond beam block and horizontal rebar is placed in the cut outs and wired to the vertical rebar. Then the blocks are filled with cement to withstand lateral forces from water pressure. |
 Foundation/vertical rebar poured.Later, I extend the pond 18 inches to give the Koi longer glides! |  Koi Filtration Components arrived.Now to figure out how to connect them together and then to the pond ;-) |  Electrical system being InstalledGetting ready to install a new GFCI electrical system for our Koi pond. Had an Electrician help remove a dangerous unused 30 Amp breaker that was running to nothing in the middle of our yard to a 20 Amp for a run to the pond filter area. Then I installed the rest. |
 Filtration system fittingAfter months of design I "dry fitted" the entire Koi pond filtration system today and it feels so good that it's all going to fit and work. Dry fitting is when you connect it without glue for spatial integration testing, straight pieces will be added when it's glued. Yay! |  3" bottom DrainCemented in the drain so it doesn't rise if water gets under liner. |  Masonry!First two of six levels up! |
bottom of page